It allows to keep PV going, with more focus towards AI, but keeping be one of the few truly independent places.
-
@magnus387 looks great - would love to see the actual clip. What settings did you use?
-
@Hallvalla I initially thought that I was shooting with Smooth -2, -2, 0, -2, but realized about halfway through the shoot that I had reformatted my card and as a result all of the shots before then were shot with the standard setting. This is one such shot. I was pretty amazed at how ColorGHear toned up the haze that occurs when shooting directly into the sunlight. I wanted to keep some of that, but also wanted the lead singer (sitting on the right of the frame) to be more visible. I'll try and get that clip up on vimeo so that you can take a look. Cheers.
-
thx - I meant to write what settings for ColorGHear.
-
If I remember correctly, I used the 5D cine gamma (because the original image was so washed out), Density at 100% opacity (for the same reasons), Spectral Enhancer at around 40% (with the saturation of the Reds -30% to protect skin tones), and Grain killer at 40%.
-
@shian - I just began rendering the ungraded, grain reduction only clips. The clip that had Neat Video applied rendered out in 13 minutes for 371 frames, utilizing 30% of my available 4GB of RAM. I started rendering out the Grain Killer clip and it only had gotten a third of the way through, utilizing 50% RAM (closed Premiere), before I had to stop it to work on other work. I'll finish rendering it through tonight after finishing off my current project. Seems like Neat Video as a more intelligent algorithm but also costs four times as much without any color tools. Grain Killer also softens a little detail where Neat Video leaves a lot of detail and even resharpens. I think the comparison of Grain Killer and Neat Video is an apples and oranges comparison. One is simply a very well configured built in tool and one is a super specific, specialized tool.
The color tools are phenomenal. When I upload the clips, you'll see just how powerful the tools are in comparison to Magic Bullet Colorista. I used to use Colorista exclusively but that's long gone now. Hello, ColorGHears.
-
Awesome stuff!
Been on set shooting test footage for upcoming film. Back to work on finishing Legacy support in the morning. Sorry it's taking so long.
After I finish that, and get some rest, I''ll get to work on neat video tests.
Also did GH2 dynamic range calibration for upcoming tutorial. Interesting findings.
-
I've just scratched the surface of the tutorials and I was in awe as to how much noise & blocking there is in the R and B channels of a MTS file from the GH2. Much to my surprise I loaded a MJPEG from my EP-1 and all the channels were equally "good". Is this a consequence of heavier sub-sampling on H.264? If so, why isn't everyone shooting MJPEG?
-
@Shian, just want to said thanks for the great tutorial, it help me learn a lot already and workflow. Just a question, is there benefits from converting the the mts footage to DXNHD in your opinion. Keep up the good work.
-
@apix If converting gives you a flatter image, then yes. The flatter your image, minus baked-in gamma and noise, the better off you'll be when it comes to grading.
@duartix That's probably a question for @driftwood or one of the other compression geniuses, but I'm guessing its because the intra stuff is looking better to the eye, and then card space/spanning issues. I will have to do some tests shooting with both and see which holds up better to grading and produces the best end product.
-
@shian I was watching the latest tutorial and hoping you split the stylish pass layer, and you did. So eager to try it out with eoshd's footage tonight. I'm getting it. Color grading is a process. Great work. Looking forward to seeing more tutorials!!!
-
@Shian Thanks for the info, noise have been a lot of problem on my test shot, maybe its the iso bug, will have to do more test to confirm. Keep up with the great tutorial =) thanks
-
@duartix The Quantum patch mjpeg settings are particularly good but still not quite on par with the AVC modes. However, I am conducting more in-depth analysis of the picture quality against each and of course, looking at ways of improving mjpeg quality further based on facts learned.
-
@shian Is it $50,00 for ColorGHear plus $50,00 for the tutorials?
-
@Nino_Ilacqua No, go here to get both for $25, total: http://colorghear.com/store/ Sorry for the confusion, it's a weird eStore software thing, but you buy CGT you get the membership free, or vice a versa, but if I change the join us membership from $50 to $25, then orders get screwed up when processing, so I have to leave it at $50 which is what the price will be after Feb 15th. After i addres all the other issues with CGT and the site, I'll see if I can't figure out what's causing that, and get it fixed.
-
@Shian I have a question about export, I am using AFX on a PC, since there is no pro res codec on the setting, it default to the animation codec, is this the same quality? thanks
-
@apix you want DNxHD. Get it here http://colorghear.com/helpful-links/
And download my AFX export settings on the member download page.
Animation is pretty good but huge file sizes, JPEG2000 is excellent - it's actually the codec used for Digital Projection in DTS theaters, but unless you have one hell of a machine, neither of those codecs will play back in realtime on your machine. So as far as a great balance of quality and file size, and playability, you want DNxHD or ProRes
-
@shian Thanks for the info =)
-
Sorry, if this doesn't belong here, but I am trying to find the best way to get my hacked gh2 files to DNxHD. I use Premiere Pro5.5 and AE, if that helps. Thanks!
-
@molloy1011 I am using 5DtoRGB like Shian suggested, and it works great :)
-
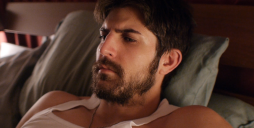
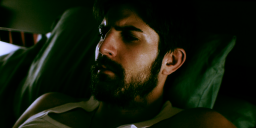
Screen grabs (cropped to exclude spoilers) of test shoot with @EOSHD Roadrunner 120Mb/s patch, 20mm f1.7 Pancake + .7 wide angle adapter making it a 14mm, graded in seconds with CGT on-set with laptop, using ColorFist, Crush, Spectral, and CineGH Lo Con Flat allowing us to make adjustments, dial in eye light, hair light, and add haze (all not pictured) for final look, and moving on.
More testing as week goes on. Shooting next week.
(as for the crop - I've center cropped the image at about 40%)

 Hotel test RAW.png1230 x 620 - 974K
 Hotel test CGT.png1234 x 583 - 687K
 -
@shian - looks good! - what wide angle adapter is that?
-
@magnus387 That's a pretty amazing demo of what you can do with colour correction. Did you treat the RH side of the image (with the man) differently from the other side at any point, or is it all done on the whole image? Looks beautiful, anyway.
And @shian thank you for sharing your expertise. When I get a moment I'm going to investigate your tools. I haven't done so yet as I don't use AE much and don't have a particular project in mind immediately. But from what you've said on this forum, I think your lessons are going to be so useful to me and I'd like to go beyond my basic knowledge of curves and relying on MB looks. I understand sound, having done it in broadcast forever and taught it for years in the industry, but colour correction has always been a bit of a mystery and it sounds like you delve into the theory in a way that promotes understanding of this.
-
@driftwood: Thanks for the note. If I have the time tonight I'll have a look at both MJPEG and AVCHD. I'm particularly curious to compare the IQ on P/B frames in order to check where there is really fire behind all the full Intra smoking madness. :) @shian: Wow, that's a major shadow crushing going on there... it's a really eye opener to all the work that's behind a big production and how raw the footage starts. :)
-
I made a quick little grade with ColorGHear, I took my good old GH1 (just to see how the GH1 footage holds up in the night low light, how the ColorGHear works with the nasty, bad looking GH1 noise in high ISO..) I have to say that the green killer is a useful thing! The Grain killer did a impressive job with the crazy noise in a green ch. ...
here it is:
-
ColorGHear is definitely looking impressive so far. I've long known that AfterEffects has all the right tools for this kind of work, but I didn't know how to use them very well. That's why plugin-based solutions have seemed so attractive up until now. Shian's approach with ColorGHear seems to give you a way of understanding how all of the tools in AfterEffects really work without hiding everything under an interface. And all of the GHears are specifically tuned to give you a good starting point, so it doesn't feel like you're starting from scratch each time you do color correction. I really do like this approach.
I do have some questions regarding my own workflow that hopefully some of you can help answer.
I use Premiere Pro and After Effects CS5.5 on a Windows 7 machine. Most of the work I do is live concert video with multiple cameras.
My first step is to do my edit in Premiere using a multicam sequence. Once I'm happy with the edit, I go through my timeline/sequence and apply an effect (usually Colorista) to each clip and use it to try to get all of the shots looking consistent. Since it's live concert footage, and the lighting conditions are a constant variable, this helps to make everything flow better visually. The scopes in Premiere also help quite a bit during this process. Since brightening up dark footage tends to bring out noise, I also apply Neat Video to clean everything up. When all of this is done, I export the sequence as a Cineform AVI.
I then import the AVI into After Effects and do an overall "look" and any titling that needs to be done before the final render.
Occasionally, I'll want to go back and change things with the edit or make other minor corrections. I've found that this workflow doesn't make that very easy. And since AE doesn't recognize multicam sequences, I haven't been able to use dynamic link as a workaround.
What I'd LIKE to do is incorporate ColorGHear into my workflow in a way that makes AfterEffects a one-stop solution for color correction and noise removal without having to do any of that sort of work in Premiere. The two things that seem to be getting in the way of that are: 1)Multicam and 2)Nearly every clip needs to be adjusted separately for lift/gamma/gain on the initial pass.
Thanks for any ideas!
Howdy, Stranger!
It looks like you're new here. If you want to get involved, click one of these buttons!
Categories
- Topics List23,970
- Blog5,724
- General and News1,346
- Hacks and Patches1,153
- ↳ Top Settings33
- ↳ Beginners255
- ↳ Archives402
- ↳ Hacks News and Development56
- Cameras2,360
- ↳ Panasonic990
- ↳ Canon118
- ↳ Sony155
- ↳ Nikon96
- ↳ Pentax and Samsung70
- ↳ Olympus and Fujifilm100
- ↳ Compacts and Camcorders300
- ↳ Smartphones for video97
- ↳ Pro Video Cameras191
- ↳ BlackMagic and other raw cameras117
- Skill1,961
- ↳ Business and distribution66
- ↳ Preparation, scripts and legal38
- ↳ Art149
- ↳ Import, Convert, Exporting291
- ↳ Editors191
- ↳ Effects and stunts115
- ↳ Color grading197
- ↳ Sound and Music280
- ↳ Lighting96
- ↳ Software and storage tips267
- Gear5,414
- ↳ Filters, Adapters, Matte boxes344
- ↳ Lenses1,579
- ↳ Follow focus and gears93
- ↳ Sound498
- ↳ Lighting gear314
- ↳ Camera movement230
- ↳ Gimbals and copters302
- ↳ Rigs and related stuff272
- ↳ Power solutions83
- ↳ Monitors and viewfinders339
- ↳ Tripods and fluid heads139
- ↳ Storage286
- ↳ Computers and studio gear560
- ↳ VR and 3D248
- Showcase1,859
- Marketplace2,834
- Offtopic1,319
Tags in Topic
- gh2 1277
- gh1 196
- color 90
- grading 76
- effects 48
- after 47
- 5d 29
- correction 19
- 7d 13
- colorghear 11


