It allows to keep PV going, with more focus towards AI, but keeping be one of the few truly independent places.
-
I'm sure I mentioned in one of the tutorials that you could do that if you felt like it; to give you more options, but I am very pleased to see you experimenting with CGT, and not placing limitations on yourself or your tools.
-
@shian it could be. Also, I haven't gone through all of them yet either. I just anticipate a lot of folks dragging and dropping without necessarily taking the interaction of blending mode into account for each type of operaton. The color grads, for instance, I don't know which would be worse, them thinking they're broke or thinking that's how they're supposed to look with the default blending mode.
That could very well be a bad assumption on my part, since I don't come from any sort of heavy Photoshop background. With the compositing tools "I grew up with", even if they had the full gamut of operations from the Ron Brinkmann books on tap, it was rare to use anything but over,add,screen,mult, inside or outside and a few more I can't remember anymore because newer software tends to dress up the terminology a little.
Attachment: take a look at this, if you like.
1) This is what I use for sharpening instead of any of the built-in sharpening tools and like the result. It's a high-pass filter, essentially, for After Effects. At a filter size of '6' it works pretty well for DSLR footage without heavy false-edging like you get with traditional sharpening filters. It works better than un-sharp mask as well. (transfer mode: OVERLAY)
2) You've got your Tony Scott homage, here's the above set to Dragan ;)
3) And here's a version of the pixelart attempt to mimic cross-processing, fixed to work in a 32bit linear workflow. (I'm gonna be bugging the Film Convert guys to add cross-processing and dye-transfer to their film presets once they're done adding new camera presets)

 ***SPACEMONKEY***.zip19K
 -
there will be a cross-processing GHear in CG Pro, maybe 2 or 3 eventually, but at least one as of right now.
-
Schweet!
-
There's a link to the "before ColorGHear", original version in the details section on VIMEO, but here's my first use of CG going back to a project file that I always wanted to be more colorful...pretty happy with how well I was able to suck the haze from the bad overhead lighting out and juice the color on the cars and people.
-
How to make a perfect couple between older versions of Sony Vegas Pro and Resolve Lite to involve ColorGHear.
I'm working with Sony Vegas Pro 11. Hence I think about a convinient workflow which would include Resolve Lite to finally involve ColorGHear methods. Does anybody have an idea of economical workflow.
What's about:
a) converting mts files into lossless video file which Resolve Lite could read, use these files as source files.
b) start cutting these source files with Sony Vegas Pro 11
c) consolidate source files to a single folder by "save as"-method of sony vegas whereas trimmed copies of source media are developed
d) use these trimmed copies to start color grading in Resolve Lite
e) render final version in Sony Vegas
I do understand that using Sony Vegas Pro 12 would be easier, but what about the older versions...
-
You can export an AAF which is the same as exporting an EDL or XML and it'll open your Vegas edit in Resolve.
-
Hi @shian and other GHears,
I have a problem with "colors" in After Effects, so I would appreciate if you could give me an advice in terms of exporting final footage after grading with ColorGHear and getting the right colors (I'm on a PC, AE CS6, Win 7).
After exporting with DNxHD the blacks in my images are TOO pure and the whites are TOO pure as well. As I understand, GH2's range is (16-235), but I interpret my GH2 files as "HDTV Rec. 709" (not as "HDTV Rec. 709 16-235" - broadcast range).
If in the AE's output settings I choose "Rec. 709", I get a clean graded image but it's too contrasty! And If I choose "HDTV Rec. 709 16-235" then the blacks in my image are faded too much. I've watched a lot of screengrabs from different movies in terms of analyzing the levels of black and none of them has a pure black. The black is not that "deep"/pure in these movies.
@shian, I know you're on a MAC, but taking into account your experience, what if you maybe know how to get the "correct look" in terms of blacks and whites. Maybe with Color Finesse?
Thanx in advance.
-
@shian, many thanks... I'm relatively new with Vegas and was focused on 64 bit version. Now I realize that exporting an AAF is only possible in its 32bit version. Hence in reality no problem to switch as 32bit and 64bit can run on same computer.
The route via free Resolve Lite should now make your ColorGHear system really affordable for almost everybody. In addition to Sony Vegas Pro what kind of NLE Programs can be used. I would guess Magix Video Pro, Edius Pro, AVID Media Composer... and what else?
My question is then, how to behave if it comes to noise reduction. Resolve Lite does not include it. If Sony Vegas would be involved it could only done (by NeatVideo) after color grading.
-
@shian, Hi again,
Just wanted to call off my request for help :-) I've solved the problem with the colors myself. Made a lot of tests in AE and searched through some sites.
What I'm gonna state now concerns a lot of GHears (on a PC - for sure)!
GH2 files have the broadcast luma range (16-235: black - 16 and white - 235). It's not a full swing range (0-255). When you output your files in AE you gotta be very careful with the color management output settings and watch out for you codec's settings. In my case it's DNxHD (I'm on a PC). This codec has two internal color settings (you can use color setting: "709" or "RGB"). And this is very important.
If you use "709" in DNxHD then you'll get a nice colored look (the blacks are very pure, meaning the highest level of blacks is 0, not 16!). With this setting your image is very contrasty. I don't know about ProRes (for MAC users) but I assume everything's the same.
For example, if you output a movie in 709 full range (DNxHD is set to 709 as well) and this movie is cropped to 2,35:1, when you play this movie in full screen you'll see the upper and lower black bars (projecting by your monitor). The highest level of your movie's black will be the same as the black color of the bars.
Now play any blu-ray or DVD on a PC. You'll notice that any uncropped widescreen movie (16:9 aspect ratio, inside -2,35:1) has these bars. Are they pure as the bars mentioned above? Right, they aren't. Because every blu-ray disk/DVD is recorded with the broadcast luma range (16-235) and the black level in these movies is not that "deep" and "pure" at all.
You can say that it's not a problem. Well, I think it's not a problem but... If you wanna get the CORRECT look, the first thing you gotta think about is the final detination of your output (meaning: will it be a movie theater, broadcast TV, your home blu-ray player, your PC or web sites?) because the correct level of blacks is not the same for the final output destinations I mentioned.
It's my personal view. Any comments are welcome.
-
Try to import AAF from Vegas 11 into Resolve Lite 9. Use CONFORM/File Import AAF,EDL, XML... After confirming first dialog box get second Resolve dialog box which tells: "Start importing ...." and then "COM Operation failed HRESULT -".
Is ther another way for Sony Vegas 11 to work with Resolve Lite 9. Seems to be a common problem http://personal-view.com/talks/discussion/4083/aatranslator-conversion-tool-adds-video-capabilities-help-make-them-better/p1
-
One possible workaround is to import the AAF into After Effects, save that file and open it in Premiere Pro, and then export an edl or XML from PP
-
@shian I must be daft but I can't seem to find your other ColorGhear tutorials on your site or on your Vimeo page. I have watched the intro video and the two primers but there are others, right? Can you point me in the right direction?
-
@QuickHitRecord you have to Login to be able to watch all the CGH Tutorials and FilmSchool videos.
-
@Flaaandeeers I had never realized that that the 'Tutorials' menu header was clickable. I guess I just assumed that they would be under 'Film School'. Thanks.
-
Yeah, that will change here in a week or so. The site will get a little easier to navigate.
-
Hey, @shian
just curious what hack settings you are liking the most these days and why.
-
@shian I am watching your ColorFist tutorial. In Color Finesse (bundled with AE CS6), I can adjust the luma range (and the high/med/lows of the luma range window shift as I make adjustments), however the waveform and final image do not change at all like they do in your example. I have the little box checked to enable Luma Range changes. The other controls all effect the scopes and the 'Result' image; it is only Luma Range that is unresponsive. What am I missing?
-
@QuickHitRecord - screenshot? I'm not following what you're describing fully.
@B3Guy - only Intravenus...and because I like it, perfect grain, great color, and slightly soft... without getting into the icky 5D type softness
-
CG Pro grade in Davinci with 2 secondaries applied along with Simply Warmer GHear, and then ported to AE to take advantage of GHrainKiller for skin detail softening.
Shot on GH3 with Nikon 50mm.

 period piece RAW.png1778 x 851 - 2M
 period piece CGPro.png1779 x 851 - 2M
 -
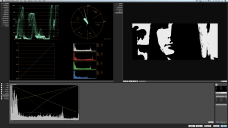
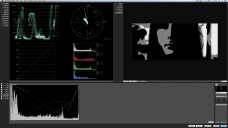
@shian For example, I'm manipulating the ranges in a completely different way in each window, but the waveform is not changing to reflect any difference.
... unless this tool is only used to define what the program sees as high/med/low, but I could have sworn that your waveform was jumping around in real time while you were doing the tech grade of your dog.

 1.png2560 x 1440 - 394K
 2.png2560 x 1440 - 398K
 -
That is EXACTLY what that tool does. Go back and look to see if I changed any other values first. Because that would cause the waveform to jump.
-
@shian are you jumping among FCPX, Davinci, and AE? That must be lots of jumping...
The more I use Color Finesse, the more I hate it.
-
How's the integration between Davinci and AE?
Can the apps open a same project and edit on the fly? i.e. Make a change in Davinci, then switch to AE and see the change immediately?
Does Davinci render faster than AE for simple color grading without any tracking?
-
@stonebat well my workflow is a little unorthodox (u should be used to that by now), but very effective. I'll cover it in the tutorials. But the simplest answer to your question is, no... U can't. But I have devised a way to take advantage of the strengths of all 3. Depending on what you are trying to do, in some cases, you'll need to use Davinci's round tripping functionality, and in others its completely lossless. I've come up with a number of ways to use Davinci EVEN if your system won't run it properly. For instance if u are on a mac, and lack the proper video card to be able to render out correctly.
but yes in most cases Davinci is much faster. even when tracking.
Davinci is terrible at only a handful of things, things which AE excels at.
Howdy, Stranger!
It looks like you're new here. If you want to get involved, click one of these buttons!
Categories
- Topics List23,981
- Blog5,725
- General and News1,354
- Hacks and Patches1,153
- ↳ Top Settings33
- ↳ Beginners255
- ↳ Archives402
- ↳ Hacks News and Development56
- Cameras2,362
- ↳ Panasonic991
- ↳ Canon118
- ↳ Sony156
- ↳ Nikon96
- ↳ Pentax and Samsung70
- ↳ Olympus and Fujifilm100
- ↳ Compacts and Camcorders300
- ↳ Smartphones for video97
- ↳ Pro Video Cameras191
- ↳ BlackMagic and other raw cameras116
- Skill1,961
- ↳ Business and distribution66
- ↳ Preparation, scripts and legal38
- ↳ Art149
- ↳ Import, Convert, Exporting291
- ↳ Editors191
- ↳ Effects and stunts115
- ↳ Color grading197
- ↳ Sound and Music280
- ↳ Lighting96
- ↳ Software and storage tips267
- Gear5,414
- ↳ Filters, Adapters, Matte boxes344
- ↳ Lenses1,579
- ↳ Follow focus and gears93
- ↳ Sound498
- ↳ Lighting gear314
- ↳ Camera movement230
- ↳ Gimbals and copters302
- ↳ Rigs and related stuff272
- ↳ Power solutions83
- ↳ Monitors and viewfinders339
- ↳ Tripods and fluid heads139
- ↳ Storage286
- ↳ Computers and studio gear560
- ↳ VR and 3D248
- Showcase1,859
- Marketplace2,834
- Offtopic1,319


