It allows to keep PV going, with more focus towards AI, but keeping be one of the few truly independent places.
-
Hey guys, just wanted to show you what i am working on for a while. This is our final rig, i made from lot of companies stuff all around the world :) I am really proud of it :) It is very customizable. http://www.studio-x.hu/Image/rent/cinemaRIG2.jpg

 cinemaRIG2.jpg1000 x 1120 - 182K
 -
looks impressive, but what I am asking myself: do you really need all these mounts? You buy a small handy camera with great image quality and tur it into a big bulky thing.
-
A camera will last 2 years, a rig much more than that. The small size can be inconvenient, it really depends on the situation. If you go out alone to shoot your son or the flowers in your garden, it would be ridiculous. If you're shooting a short film or anything close to professional, It can be of great help for many reasons : The steadiness, the monitor, the FF, the filters, the look (trust of the team),...
-
+1 what @francoisH said. @brain said "Our" cinema rig so he must have a team of peeps to help him operate that rig. I started out with an equally cumbersome rig but since I'm a solo freelancer, I learned to whittle it down to be more mobile.
-
^ exactly, the rig won't enhance image quality, at best it's useful to hold a monitor or quickly replace filters. But the main point is to give your camera a "professional" look, which is essential when working in specific circumstances. Once i almost got arrested by the cops, but was saved because i was holding a sony FX 1, and another person had a mic boom.
We had to film a fiction shooting scene (hitman in a car tries to kill another guy in another car, but the other guy manages to kill the hitman), we did this on an empty industrial area (sunday). It was amateur almost semi-pro. The director had informed his aunt, who is a member of the city council, and gotten her permission, plus a supervisor for half the day. But these idiots from the city council had forgotten to notify the local police. So witnesses saw and heard the shooting (we used blank bullets, which rendered the sound of the shooting scene useless), so they called the police, which arrived with 3 cars (no siren, they tried to take us by surprise). From afar, they saw the hitman on the ground, and were calling an ambulance, when they saw me holding the camera, and then they understood, calmed down, smiled, just took note of our identities and left.
Without the obvious camera, this could have turned ugly, you never know how stressed people can react. I don't think a GH2 can have the same impact, to them it's just a photo camera.
-
WOW... that rig is mighty huge. So far I've spotted black, green, blue and red color knobs ;) How much did your rig cost?
Is it practical in run and gun situations? Can you put it on your steadicam?
My rig, which is mostly DIY has cost me around £150 (including quick releases and follow focus), but I've designed it to be very minimalist (i.e. portable and light), but at the same time multi-functional. I'll post pics when I complete the remaining parts.
-
Hey, guys! Thanks for the replies! Of course we are not using always the camera like this. This photo for our rental part, because it shows everything on it.
In this configuration it is very heavy, but some guys need these things, because they are accustomed to this. especially big production teams who r shooting commercials.
When we use it, we always customize it to our needs.
kronstadt: We reconfigure it, when we going to use it with steadycam, here you can see a video:
-
Beautiful rig @brain .. I am heading same direction .. and also with a lanparte base, as I get ready to switch from my EX1 to my DSLR sized cameras (GH2 and BMDCC ordered)
I think it is worth spending 2 to 3 times more on the rig than the camera. As others have said .. the camera will last 2-3 years the the rig 10-15.
-
I don't want to start a new thread...so I'm just posting it here (please let me know if thats ok @brain ):
After...uhg, I think 3 or 4 years from the first idea of making my own rig to a working "prototype", its time to share some pics.
The location (thanks to my grandma, for letting me piss of all her neighbours with very loud noise every saturday for 2 years;-):

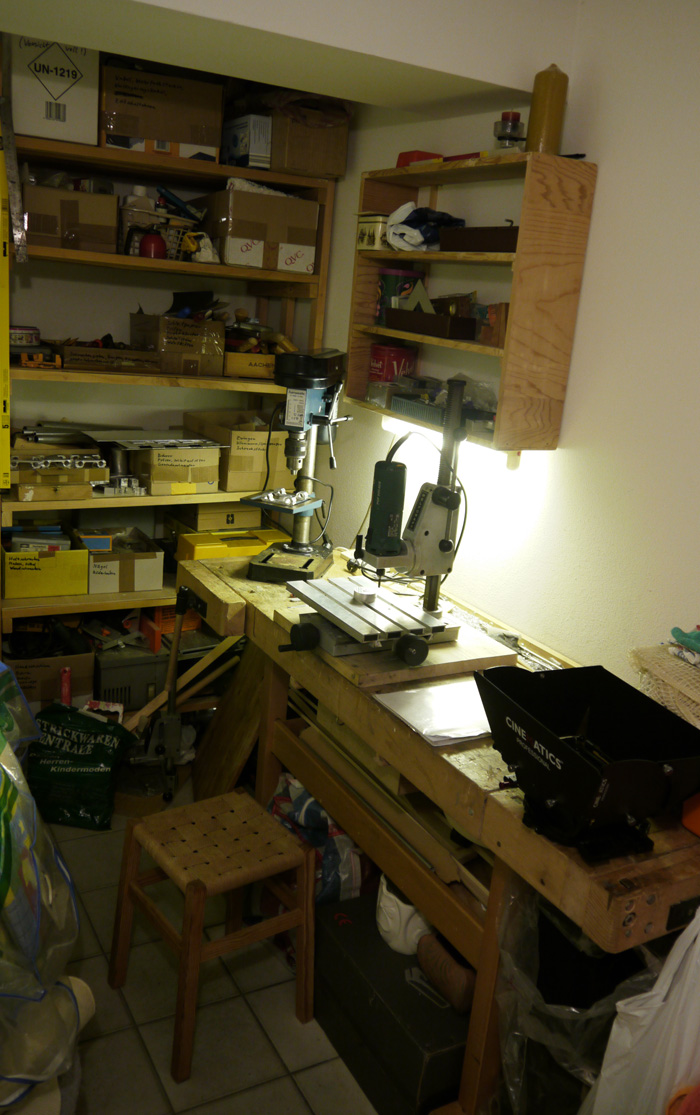
Drilling and milling machine, some tools. All parts are cut from solid aluminium blocks. No CNC, no lathe :-(
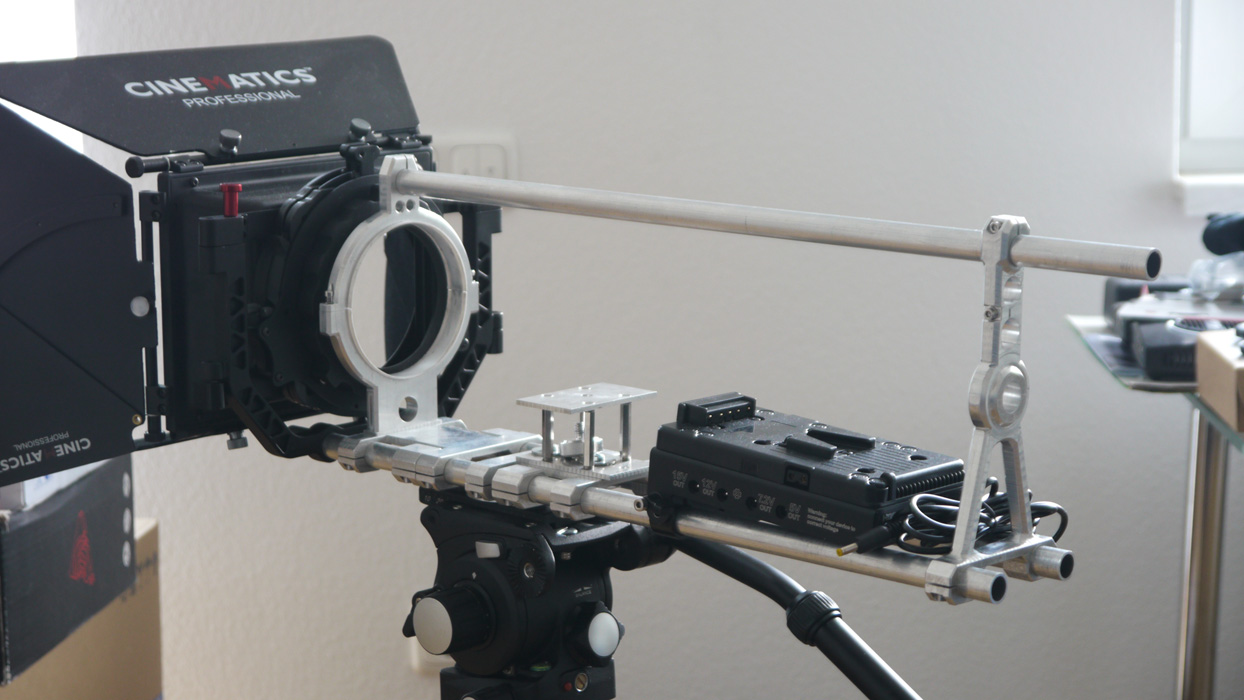
Half assembled rig:

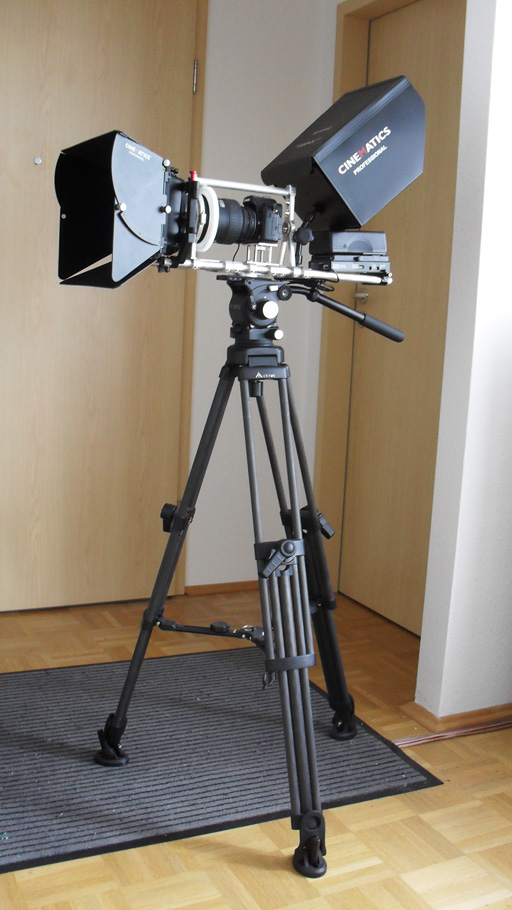
From left to right: Cinematics mattebox, lens support, railsupport, camera mounting plate, Cinematics battery pinch w/o hdmi (modified: added a step down converter inside and a plug to directly power the GH2 with 9V). All sitting on a fancier tripod with fluid head.
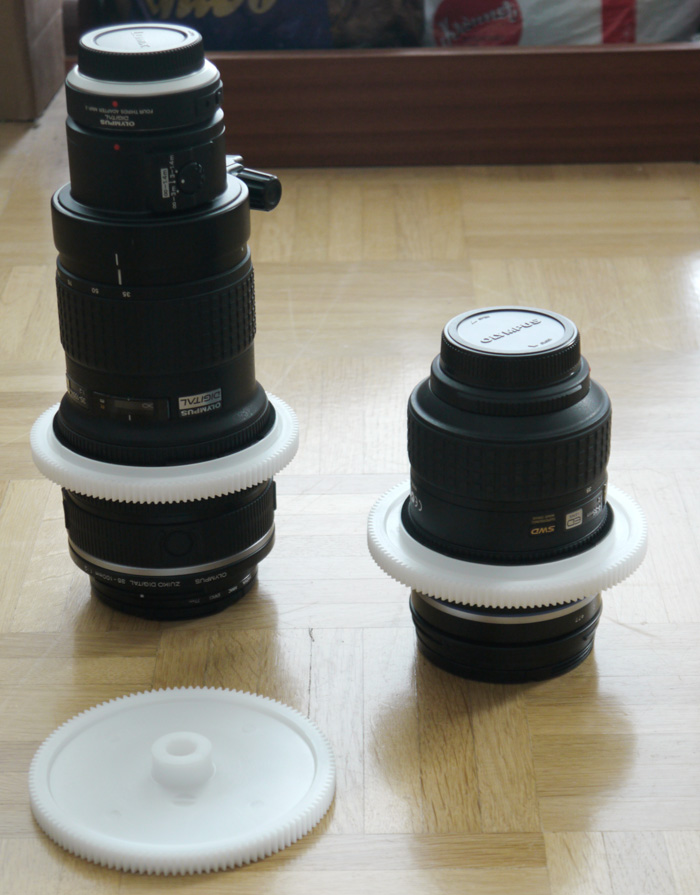
The Beasts:

Olympus 14-35 F2.0 (right) and 35-100 F2.0 (left) with gears. The white plastic gear disk is 120mm in diameter and can easily be milled to fit the focus ring (there is some foam rubber in between to dampen vibrations and to make the gears removable).
Not in the picture: GH2, wireless hdmi transmitter w/ hdmi splitter, DP1x 10" monitor with cinematics hood.
Still to be made: stepper motor box to drive the focus ring, motor controll via the USB back channel of the wireless hdmi transmitter (thats going to be a nasty one!), very strong clamp to get the 10" monitor mounted to the rig. Getting carbon tubes. Painting everything black when finished.
This is all only stage one, as the rig is designed to be the upper part of a steadycam system (battery and monitor will move to the lower part of the system). I'm very close to stage two, but I can't wait,....want to start shooting ;-)
'
'
'
One word on the design of rail systems. The clamps, baseplates, rails supports,... you can buy are not bad, they are a JOKE! Especially for the price they are asking. There is NO technical design behind it, its just blocks with holes. I can do one of those in about 10min without a CNC milling machine. Thats like selling you a planc with 4 stone wheels, calling it "pro", "dslr",... and charging $10000000. There is a reason behind industrial design - and that divides BS from good products.
My railsystem with support and all clamps is only 20mm high (15mm rods), all parts can go in between others to save space and make more combinations possible, it weights halfe of a "normal" rig but is as strong...and I had only some basic training on how to work with metal parts and how to design them. I'm neither professional in this field, nor do I have the machines you normally need for such a job. But to overcome my "amateur" limitations, e.g. I made a 3D modell of one of the most complex and important parts in Cinema4D, animated it (rotating) and made a stereoscopic red/green video to judge if it will be strong enough (I couldn't be bothered getting into calculating its stability). If you think about it, its quiet an effort for a DIY project....but thats industrial standart.
So, next time you need a clamp, don't order from one of this over priced "pro dslr companys", just ask around your neighberhood for a skilled metalworker. He will need a good drawing and some explanation, but can do those things for you for half the price (and no shipping cost).
(I don't blame those chinese manufacturers, as they usually only copy the design. I'm talking about thoses European/American companys that are getting quiet wealthy...they can even afford big marketing events like "shoot outs" :-P

 Werkstatt.jpg700 x 1115 - 260K
 Rig-01.jpg1244 x 700 - 208K
 Cine-Gear.jpg700 x 895 - 176K
 -
@Psyco : I agree with you a lot, but the thing is that you cannot compete with the Chinese prices.... OK, American gear is expensive, but if I would like someone to build simple parts like rail blocks, I would pay at least three times as much as I can get it from ebay (even with shipping, etc)...
You simply cannot compete with mass produced parts in regards of price...
-
@tonalt I got them from here: http://www.conrad.de/ce/de/product/237647/ACETALHARZ-STIRNZAHNRAD-M1-120Z (German online/shop)
They are modul 1 cogwheels, so do not fit the normal FF gear which is modul 0,8. They come in 12, 15, 20, 25,... mm diameter - so maybe you can replace that cogwheel of your FF with one of these. They are very well made, easy to cut and have no play but still turn easily.
-
@Alfi666 I was not talking about the low price chinese copies. I was talking about the American/European companies that sell the same parts for 3-5x the price but still use the same bold "design", instead of adding a couple of code lines to the CNC program and making the parts more usefull, light weight,... . They are just to lasy and to many people (with more money and less brain) pay for that BS.
If I would have a CNC milling machine, I would start my own business - and I would call my rig "The Hiper DSLR Pro Cinema Rig" and sell it for 10x the normal price...and there would be my name in big golden letters all over the parts, and I would start to make big DSLR shoot outs with my gear,...hahaha;-)
-
Thanks @Meierhans - it will be "awesome" when its completed to a full steadycam rig ;-)
I had a look at the Arduino, but I'm not sure if it will do the trick...and 2 mainboards and at least 1 motor driver board and 1 USB board - its going to cost quite a bit.
The point is:
I will use an incremental position encoder which outputs two digital signals and a stepper motor which only needs two digital signals. So, I would only need something that passes these two signals through one USB channel.
The hard part is, how to tell the USB controlers on the wireless modules to "just pass the signals to the other side and don't worry about the rest" ?
I was even thinking on using audio d/a and a/d converters, but they probably won't work without a computer in the midle.
-
Arduino is a computer. I cannot imagine how it could not be done - even if you need to build a whole robot;-)
-
For example, this should do it although like using a sledgehammer to kill a fly..
http://www.automationtechnologiesinc.com/products-page/3d-printer/ramps-pre-assembled-kit-complete -
@goanna And how do you tell that board what to do? As I understand it, you need a computer.
Having a laptop controlling the stepper motor would be interesting, if I want to use predefined (key-framed) focus points, but thats not my goal at the moment. I want a wireless user controlled FF with the least amount of electronics.
-
As I understand it, you need a computer.
Yes, you use a computer, inasmuch as you write and test your program or "Sketch" and then transfer the compiled program to the Arduino:
From Wikipedia: "It is designed to introduce programming to artists and other newcomers unfamiliar with software development. It includes a code editor with features such as syntax highlighting, brace matching, and automatic indentation, and is also capable of compiling and uploading programs to the board with a single click. There is typically no need to edit makefiles or run programs on a command-line interface".
http://en.wikipedia.org/wiki/Arduino
There are good books to begin programming; also sites like http://www.psurobotics.org/wiki/index.php?title=Arduino_Programming
-
@goanna Sorry, but its not as straight forward as you think, to get what I need. As far as I understand, you can't use the USB port on the Arduino board to send or receive signals (its only for uploading the software).
I think @Meierhans is on the right track. So, you can set up one USB shield as host - I didn't find any information about that point - thanks.
Howdy, Stranger!
It looks like you're new here. If you want to get involved, click one of these buttons!
Categories
- Topics List23,979
- Blog5,725
- General and News1,352
- Hacks and Patches1,153
- ↳ Top Settings33
- ↳ Beginners255
- ↳ Archives402
- ↳ Hacks News and Development56
- Cameras2,362
- ↳ Panasonic991
- ↳ Canon118
- ↳ Sony156
- ↳ Nikon96
- ↳ Pentax and Samsung70
- ↳ Olympus and Fujifilm100
- ↳ Compacts and Camcorders300
- ↳ Smartphones for video97
- ↳ Pro Video Cameras191
- ↳ BlackMagic and other raw cameras116
- Skill1,961
- ↳ Business and distribution66
- ↳ Preparation, scripts and legal38
- ↳ Art149
- ↳ Import, Convert, Exporting291
- ↳ Editors191
- ↳ Effects and stunts115
- ↳ Color grading197
- ↳ Sound and Music280
- ↳ Lighting96
- ↳ Software and storage tips267
- Gear5,414
- ↳ Filters, Adapters, Matte boxes344
- ↳ Lenses1,579
- ↳ Follow focus and gears93
- ↳ Sound498
- ↳ Lighting gear314
- ↳ Camera movement230
- ↳ Gimbals and copters302
- ↳ Rigs and related stuff272
- ↳ Power solutions83
- ↳ Monitors and viewfinders339
- ↳ Tripods and fluid heads139
- ↳ Storage286
- ↳ Computers and studio gear560
- ↳ VR and 3D248
- Showcase1,859
- Marketplace2,834
- Offtopic1,319


