
-
I think I may have a killer combo... new LUT + Matte LUT + Filmconvert
It's amazing how much detail came back in the girl's face. Gradation from black to mids is very smooth and getting back some details in the highlights.
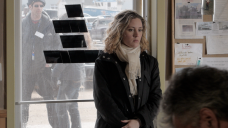
 Natural -5.png1200 x 674 - 1M
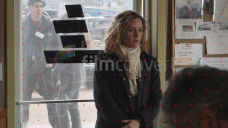
 Lut+filmconvert.png1202 x 675 - 1M
 -
@yak Looks good! What's the Matte LUT?
-
@superset Just a matte effect
Here is a new LUT bases on natural - 5. - Red hue brightness adjustment ( Reds are often too bright ) - Red hue desaturation ( When saturating the red color oversaturate. ) - Saturation - Luminance Curve adjustment ( Smoother gradation from Blacks to Mids ) - Color Correction ( Added a little of a green cast to kill the magenta cast )

 ailut2.jpg720 x 808 - 154K
 GH3 skin V3.cube.zip141K
 -
@yak Sweet, will give this a go and thank you again!
PS. I just noticed that you added FilmConvert to your workflow as well (noted above). Doesn't FC undo some of your LUT changes to Sat, Lum, and Curves? -
It changed de adjustment, based on what it changed that I liked I tried to correct my LUT accordingly
-
@yak those pics look good with LUT applied could anyone teach a totally noob how to work with LUT? I have Sony Vegas, still thinking of joining the Adobe Cloud as well...
-
Can't load LUTs into Sony Vegas
-
ok, one more reason to try the Adobe cloud any tutorials of how to use the LUTs?
-
Hi!
In day light I only use 1080p50 (pal) in 50mbits/IPB MOV with Natural set to -5 -5 -4 -3
That works well for me (just some curves adjustment in PP) :
-
EDIT: Didn't even make sense, sorry.
-
@olli66 For Premiere CC, add the Lumetri effect and point it to the LUT file.
-
Here is my camera sweet spot for legacy lens that shoots soft and flat... NAT 0,0,-5,-5 ISO 640 (This is important, as the colours are rich and the grain is film like when sharpened.
-
Today I finally did a test on all 6 of the GH3's picture profiles with a grey and a color chart: http://gro.solexiv.de/2014/02/panasonic-gh3-color-profiles-2/
tl;dr: I'll use NATURAL with a little less blue in the camera's white balance to achieve a realistic but not necessarily flat look. Today this is not reality proved but I'm looking foreward to trying these settings in future projects.
-
Hey Guys, one question: I red about using just the 50mbps modes because of more noise in the 72 A-I... Yesterday i made a test, same light, same profile, no movement in camera. Iso 200 I recorded 10sec in 50 and 10 sec in 72 mbps I couldnt see any difference. Is this noise more in higher iso settings?
-
@ravensith If you're shooting say... An ISO of 200 with plenty of light the noise difference between 50Mbps Inter-frame and 72Mbps Intr-aframe is more subtle. What was your subject for the 10 second test? Try a scene with these parameters: • Scene with some movement and detail. Like a bush with grass and a bit wind providing movement. • Choose a lighting scenerio where you need an ISO of say 800 to get the light meter to balance at 0. (The higher the ISO the more noise you'll get regardless of the setting. Same with any camera.) • Turn noise reduction down to -5 in camera.
All Intra and IPB Inter-frame are very different in the way the frames are produced when recording. (Google the two for a detailed explanation.) To get superior All-I footage the camera really needs to be shooting at 100Mbps or more. GH3 can't do this of course. Eg: My GH2 hacked with Moon T5 (that's an All-Intra 150 Mbps hack) kicks my GH3s butt with its 72Mpbs setting. There's no comparison. In short: All Intra takes completely separate images for ever frame so it needs more info to produce a superior quality shot. IPB Interframe samples the frames surrounding the current frame and only makes a "change" to the image where there's movement or a "change" in the image.
Hope this makes some kind of sense. Your question is a good one for sure though. We've all went through the "72 All-I or 50 IPB" saga.
Good luck!
-
@ravensith ...
maddog15 gave a good summary of how to find it ... and yes, it's there. Just looking at your footage on the camera's LCD isn't going to show it, but get it up on the "big screen" of a decent size monitor or TV and compare directly two scenes at 50Mbps and ALL-I ... and sadly, the ALL-I comes in second. Fairly close, but ... second. A bit more noise, and especially in moving items (like the grass blades) a little less detail.
I was SO disappointed to find this after getting my nifty new cam. Still, this thing shooting 50Mbps is a dang good rig. As mentioned by maddog, it just doesn't have the hardware/software capability to move that much bandwidth and keep it "hot". In my testing, the higher the ISO the more pronounced the difference. And yea ... like a lot of the other guys here, I tested for it. Desperately trying to disprove it, I might add. Well, after proving myself wrong ... I adapted mentally to the disappointment by realizing my files were going to be a bit smaller. Fewer hard-drive purchases!
Now ... as it looks like I might be able to acquire a GH4 in mid-late summer ... hope hope ... I may need to start looking for a cheap-to-purchase hard-drive factory yet ... sigh ...
-
@Yak - Your latest LUT seems to REALLY lift the shadows black level. Using resolve, it was capped at something like 16-20, I didnt check exactly. I couldnt get it to drop back down, it was just capped there. Maybe do your shadow adjustments, but keep the black level at 0.
-
Natural with settings at 0 except Sharpness and NR at -5, MOV (NOT All-I). WB at 3400K. Straight out of the camera footage (overblown background is intentional). I'm VERY pleased with colors and skin tones

 syncs Replaced.Immagine001.jpg1920 x 1080 - 532K

 syncs Replaced.Immagine002.jpg1920 x 1080 - 512K
 -
Thanks @ maddog15 and rNeil! I understand. So better film in 50 mbps now... ;)
-
my first work with gh3. Everything at -5 and 50mbps mov.
-
@rezyserzycia Nice work here. Good grading and color choice. Good cuts - appropriately timed. Music... very thoughtful. Kept my mind wondering what I'd see next. One strange jump cut in the making coffee close up but other than that... Very nice work. Thanks for sharing it.
What application did you do your color adjustments?
-
@flablo Man.... great skin.
-
Jeah @flablo and @maddog15 - when I see those skin tones flablo postet, it looks really good. For me it looks like going with -5 in NR and -5 in Sharpness is the "must-have". Other Settings like Satuation etc is a "believer". Until now I went with -3 to -4 on contrast and satuation...But I think its very situational which settings are the best / the right. Its important to have the right light. If you watch my video here:
you can see 4 different light situations...so you get another skin tone with the same settings. -
@Yak Really like the colors you got with Filmconvert. I just wish it wasn't so expensive!
I just purchased a set of Tiffen ND filters and had a chance to try them out over the weekend. I shot this clip while waiting for the bus with friends. I used the GH3 with the Vario 35-100mm f/2.8 wide open for all the tight shots, a couple were made with the GM1 and Vario 12-35, also with ND filters. Incidentally, I uploaded the video to YouTube using the X264 encoder, which helps keep colors from looking washed out. Settings: 24p, 50Mbps, Standard profile. Contrast, Sharpness and Saturation just a couple notches down from factory settings. I don't touch NR since I haven't picked up NR software yet.
-
what NR software?
Howdy, Stranger!
It looks like you're new here. If you want to get involved, click one of these buttons!
Categories
- Topics List23,970
- Blog5,724
- General and News1,346
- Hacks and Patches1,153
- ↳ Top Settings33
- ↳ Beginners255
- ↳ Archives402
- ↳ Hacks News and Development56
- Cameras2,360
- ↳ Panasonic990
- ↳ Canon118
- ↳ Sony155
- ↳ Nikon96
- ↳ Pentax and Samsung70
- ↳ Olympus and Fujifilm100
- ↳ Compacts and Camcorders300
- ↳ Smartphones for video97
- ↳ Pro Video Cameras191
- ↳ BlackMagic and other raw cameras117
- Skill1,961
- ↳ Business and distribution66
- ↳ Preparation, scripts and legal38
- ↳ Art149
- ↳ Import, Convert, Exporting291
- ↳ Editors191
- ↳ Effects and stunts115
- ↳ Color grading197
- ↳ Sound and Music280
- ↳ Lighting96
- ↳ Software and storage tips267
- Gear5,414
- ↳ Filters, Adapters, Matte boxes344
- ↳ Lenses1,579
- ↳ Follow focus and gears93
- ↳ Sound498
- ↳ Lighting gear314
- ↳ Camera movement230
- ↳ Gimbals and copters302
- ↳ Rigs and related stuff272
- ↳ Power solutions83
- ↳ Monitors and viewfinders339
- ↳ Tripods and fluid heads139
- ↳ Storage286
- ↳ Computers and studio gear560
- ↳ VR and 3D248
- Showcase1,859
- Marketplace2,834
- Offtopic1,319


